
Play with your pump first
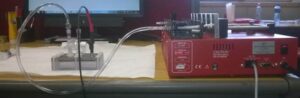
Pressure Wave Setup
These programmable pumps are incredibly capable and have a mass of computer controlled functionality. The also aren’t just a simple pump – they are complex devices. Don’t let this put you off using or purchasing a pump.
You need to budget some time to sit with the pump and the pump user guide and play with it. This will help get your head around how the pump works and familiarize you with it’s capabilities.
Once you can get some simple commands working then it’s time to sit and read about all the different commands at least once – so that you can see what functions your might use in your application.
Start by writing very short and very basic programs – this will get you used to using the Pump Programming Spreadsheet and the Pump Programming language.
If you get stuck, by all means contact me and tell me what problems you are having – I will help you.
Plan your fluid flow
![]() Writing a pump program to create a fluid flow is not a lot different to ordinary computer programming. If you have done a course in computer programming revisit the techniques your were taught to plan and design programs.
Writing a pump program to create a fluid flow is not a lot different to ordinary computer programming. If you have done a course in computer programming revisit the techniques your were taught to plan and design programs.
If you haven’t programmed before – don’t let that stop you. Whilst your learning and playing with your pump, manually enter a few of the flows and try them. This is a simple and basic step but it really helps.
At this point of time sit and write a detailed description of your fluid flow. How does it start? What starts it? What flow do you need and when. Draw a graph of the desired flow. Label it with flow rates and volumes to be pumped.
I have more detailed steps in the post How To Specify Your Flow
Hate the thought of programming? There are some who just can’t program and others whose time constraints require them to eliminate the learning curve. If your one of these people, perhaps I can help.
Waveform Flow
I often have customers who wish to pump a wave form – ramped flows, sinusoidal flow and mimic a measured flow – a common example is a blood flow. Actually that’s pretty common! It can be done. We need to talk.
Plan your pump triggers
![]() Triggers? A trigger is an external electronic signal that can trigger your pump to start pumping, stop pumping or change it’s pumping.
Triggers? A trigger is an external electronic signal that can trigger your pump to start pumping, stop pumping or change it’s pumping.
For example people working with different lab scanners might need a sample irrigated or washed in a fluid whilst on the slide or what ever actually contains the sample they are scanning.
These scanners will output a digital signal – a logical 0 or 1 that indicates that they are finished or about to start a scanning operation or pausing operation. This signal can be connected to your pump and through the use of event triggers in the pump programming language you can have the pump start or stop pumping or change to a different rate.
This is very handy. Very popular with microscope users.
You can use a pump to generate a trigger signal to start or stop another pump or group of pumps. I did a job for a prestigious German research institute in which the pumps were connected in a ‘circle’. Pump 1 triggered pump 2 which triggered pump 3 which in turn triggered pump 1. This application required repeated rinsing and washing with a reagent. I then provided three Muli-Pump recipies which implemented different treatments and rinses for many hours at a time.
Are there program limits?
Yes the pumps are computer controlled mechanisms. Both the computer part and the mechanical parts of the pumps have performance limitations.
Rates Volumes and the Range of Rates and Volumes
Rates and volumes that you can program are limited by the size of your syringe, your pump’s pumping force. The range of rates available within a pump program are limited by the syringe size and your pumps mechanical parameters. You can learn more about these by reading your pumps Rates and Specification Sheet. So you cant expect to pump ml/minute and then nl per hour. It’s not mechanically possible with a single syringe and depending on your range not possible with a single pump. However this rarely seems to be a real life issue.
Your pump will only accept a range of syringe sizes which again appears in the Rates and Specification Sheet.
The Pump Program
There are only a certain number of steps available in the pump for you to program. This can be determined by reading your pump manual. Typically 41 or 340 steps are available to you. Whilst 41 steps doesn’t sound like much – it’s amazing just what flow complexities can be achieved with a little optimization.
To get the higher number of steps you need X model firmware for your pump. See this page to learn about the X model firmware.
If you need really complex flows – use more than one pump.
Using your plumbing you can combine more than one pump to produce complicated flows but assigning different pumps to produce different parts of the flow. Now read the topics Multi-Pump flows and Triggers.
Where to find Pump Commands

Pump Run Command
The best place to find all the pump commands listed and their syntax details is in the pump manual. I have many pump manuals available for download.
It might take you a little while to understand the way a command works but the example shown here is very typical. These technical descriptions at first glance might appear to be hard to follow but after studying and using a few commands you will soon get the hang of it.
Your first Program
![]() When you first start programming your pump you have a lot to learn. Take small steps. Work out what volume of fluid you wish to pump and at what rate. Use the pump programming spreadsheet and create your first program. Upload it to your pump and run it. Did you get what you expected? If not try changing your program in the spreadsheet. Iterate until you get the fluid flow you wanted.
When you first start programming your pump you have a lot to learn. Take small steps. Work out what volume of fluid you wish to pump and at what rate. Use the pump programming spreadsheet and create your first program. Upload it to your pump and run it. Did you get what you expected? If not try changing your program in the spreadsheet. Iterate until you get the fluid flow you wanted.
Now start planning your flow – perhaps roughly. Change your spreadsheet to add this additional flow. Upload it to your pump. Test your program and adjust.
In this manner with time spent planning your flow and then programming the flow then testing the flow you will start taking steps towards your final ideal flow. You will be amazed at how quickly you learn the process and the pump’s characteristics.
Uploading programs
![]() Programs for your pumps can be created using a simple text editor or using our simple pump programming spreadsheet. The end result is a simple text file (not a word processor file) that contains a series of pump commands. These are the same commands that a person with a buttoned pump (pictured) might create in the pump by manipulating the buttons to select from menus sometimes several levels deep.
Programs for your pumps can be created using a simple text editor or using our simple pump programming spreadsheet. The end result is a simple text file (not a word processor file) that contains a series of pump commands. These are the same commands that a person with a buttoned pump (pictured) might create in the pump by manipulating the buttons to select from menus sometimes several levels deep.
So why would you use a computer at all?
Creating the pump program out side the pump and then uploading it into the pump with SyringePumpPro gives you the perfect combination of ease of editing with tools your familiar with AND being able to rapidly make small or complex rewrites and upload them.
From the pumps front panel inserting a line of pump program into the middle of an existing program – requires re-entering every line after the insertion. Too bad if line 1 is your insertion point. With an externally created program that is uploaded give you the perfect place to document your program, and keep a record of what your doing. Sharing a pump with some other lab user – pump programs really save a lot of monotonous key pad punching and time.
Program Documentation
![]()
Program documentation
Good scientific procedure calls for thorough documentation of the science. When you use a programmable syringe pump, the programs you write become part of the scientific method you used and as such require documentation.
Specifically programmers refer to this documentation as internal documentation as it is internal – inside the pump program.
What should you document?
- Describe the flow. Ok a lot of them are fairly simple – but they need to be stated.
- Multi-pump flows – You might need to create a general description and place it in one pump program file and then in the other pump program files – make a note to see the description in the file xxxx.ppl
- Interaction with any other pumps or devices – any triggers?
- Any calculations used to determine flow rates and volumes along with note on how you arrived at these. Some times trial and error is used to estimate these things – document the process.
- Name of the file where the pump program is stored – helps people find it.
- Program Author, contact details.
- Owning institution – whom the work was done for – this establishes copyright ownership of the work.
- Date – when work started.
- Date of any revisions with notes about what the revisions were done for.
- Testing Record any testing that was done for the pump program.
- Lots of comments in the code – every line doesn’t need a comment but every now and then some comments about what is going on is really helpful – to the future you who has to revisit this program and cant remember what happened – or to another who has to work with what you have made.
- Use comments to indicate where to change rates and flows and how to arrive at those rates and flow.
More than one pump – recipes
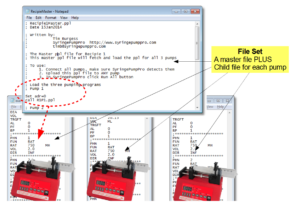
Multiple pump file sets
More complex fluid flows are often implemented using multiple pumps. This can be ingredient mixing or wave forming of flows (you can have one pump providing a base flow and then another adding and subtracting from that base flow to build complex wave form. This is being done be several SyringePumpPro customers.
When you create the pump programs for a group of pumps involved in creating a complex flow, you need a way to co-ordinate the uploading and configuring of the pumps involved as a group. Makes sense to have the one control file which avoids/prevents a human from mixing the pump programs and uploading the wrong program to the wrong pump.
A multi-pump recipe is used for this.
Build incrementally
![]() The biggest mistake I see with new pump users is that they are excited, and they want to get their flow programmed – NOW! They have waited to get the pump, got it connected to the computer, bought a copy of SyringePumpPro and they’d like their flow in the next 10 minutes.
The biggest mistake I see with new pump users is that they are excited, and they want to get their flow programmed – NOW! They have waited to get the pump, got it connected to the computer, bought a copy of SyringePumpPro and they’d like their flow in the next 10 minutes.
I see this pressure to get a result in a lot of students – suddenly project is due tomorrow, planning to install SyringePumpPro today, finish project for presentation tomorrow. I wish this wasn’t the case but it happens. :-{
They attempt to jump straight to their final result – not knowing how the pumps work or what commands are available to them.
I urge you to take a couple of hours and build your flow – perhaps one feature at a time.
Build the simplest part of your flow first – program it, upload it and see what you get. If that works, add another component of your flow, test again.
This is called building incrementally and while you do it – your climbing a learning curve.
Time Delays
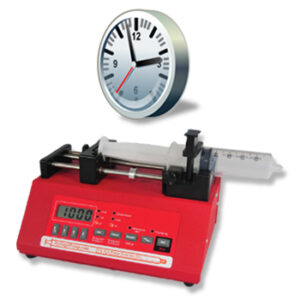
I think there’s only two things I really need to say about delays – I tackle this with the two questions I get regularly.
Q: Can pumps wait before or during their pumping?
A: YES! This question comes up a lot.
Q: I see the pumps only can delay up to 90 seconds…. I need X hours – is that possible?
A: YES – it’s easy – stick a timed pause command into loop and then if you need longer delays – put that loop in another loop. Need a longer delay still – use another loop. This technique is called nested looping. You can delay for days like this.
How to get a certain length delay
A pump Pause command can only pause for 99 seconds maximum and minimum of 1 second.
A zero second pause is treated by the pump as a wait for an external event. If you don’t have an external event configured – then it’s a wait for ever!
Long delays are made with time delay loops.
1 Hour Delay
lps ; loop start
pause 60 ; 60 seconds
lop 60 ; loop 60 times - that makes one hour.
3 hour Delay
lps
lps ; loop start
pause 60 ; 60 seconds
lop 60 ; loop 60 times - that makes one hour.
lop 3 ; loop the previous loop 3 times to make 3 hours.
Try that technique.
Testing Time
![]() So you create a pump program and it runs over minutes/hours/days. How do you test that it does what you think it does?
So you create a pump program and it runs over minutes/hours/days. How do you test that it does what you think it does?
I have two techniques I use.
- Study the SyringePumpPro log file – it’s all in there. You can load it into a spreadsheet if you wish – that can help. When there are more than one pump involved it can be hard to picture what’s going on.
- Screen capture SyringePumpPro and examine the video that is created. This makes it real easy to jump to a time when pump x should do …. or pump y should have done…..
Multi syringe pumps
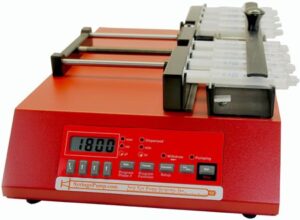 What does a multi-syringe pump look like when you are programming it?
First you should know that the pump computer chip has no real idea that there is more than one syringe up on top. It cannot control any of the syringes individually.
The best way (the only way) is to treat it as a single syringe pump – that happens to do the same thing a number of times.
These pumps are often called multi channel pumps – the idea being that you program a channel to deliver a certain flow, and then have one or more other channels that repeat the same flow into different plumbing.
You can also think about combining the channels using plumbing to get 2X or 3X etc the single flow that you have programmed.
Don’t forget! The pumping force is shared by the number of syringes you have installed – there is only a single drive chain.
Pump inputs and outputs
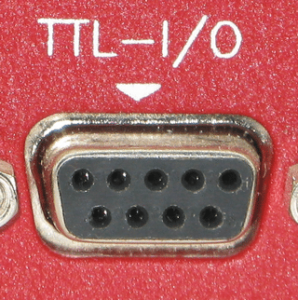
Pump TTL Db9 Connector
Programmable pumps have digital input and output pins. These can be used to send or receive digital (0/1) logical level electrical signals. This is then used to trigger the pumps to change their activity – start or stop or change to another pumping phase.
The connector pictured is not the RS232 connector, it’s where the pump front panel lock out connector connects, the foot switch connects, or where you might connect your microscope to irrigate a slide sample, and all sorts of other things. The front panel lock out connector and the foot switch are implemented using simple digital inputs.
Also available are output signals to indicate the pump is pumping or stopped and whether the pump is infusing or withdrawing. And that’s how the digital reciprocating pumping cable works along with built in software in the pump.